TL;DR
The most effective way to quiet a closet rig isn’t just adding foam—it’s about strategic placement, sealing gaps, and managing heat. Properly treated, a closet can become a surprisingly good recording space, especially if you move the rig out of sight and mind.
Ever wondered why your closet sounds so echoey or loud, even with foam panels? It’s because small spaces create intense reflections, and noise leaks happen through gaps, not just the walls. The real magic isn’t just about buying foam — it’s about understanding how sound works and where to focus your efforts. Learning about acoustic dampening and placement can make a big difference.
In this guide, you’ll learn how to turn your closet into a quiet, effective recording space. From placement tricks to ventilation solutions, I’ll show you what actually makes a difference—saving you time, money, and frustration.
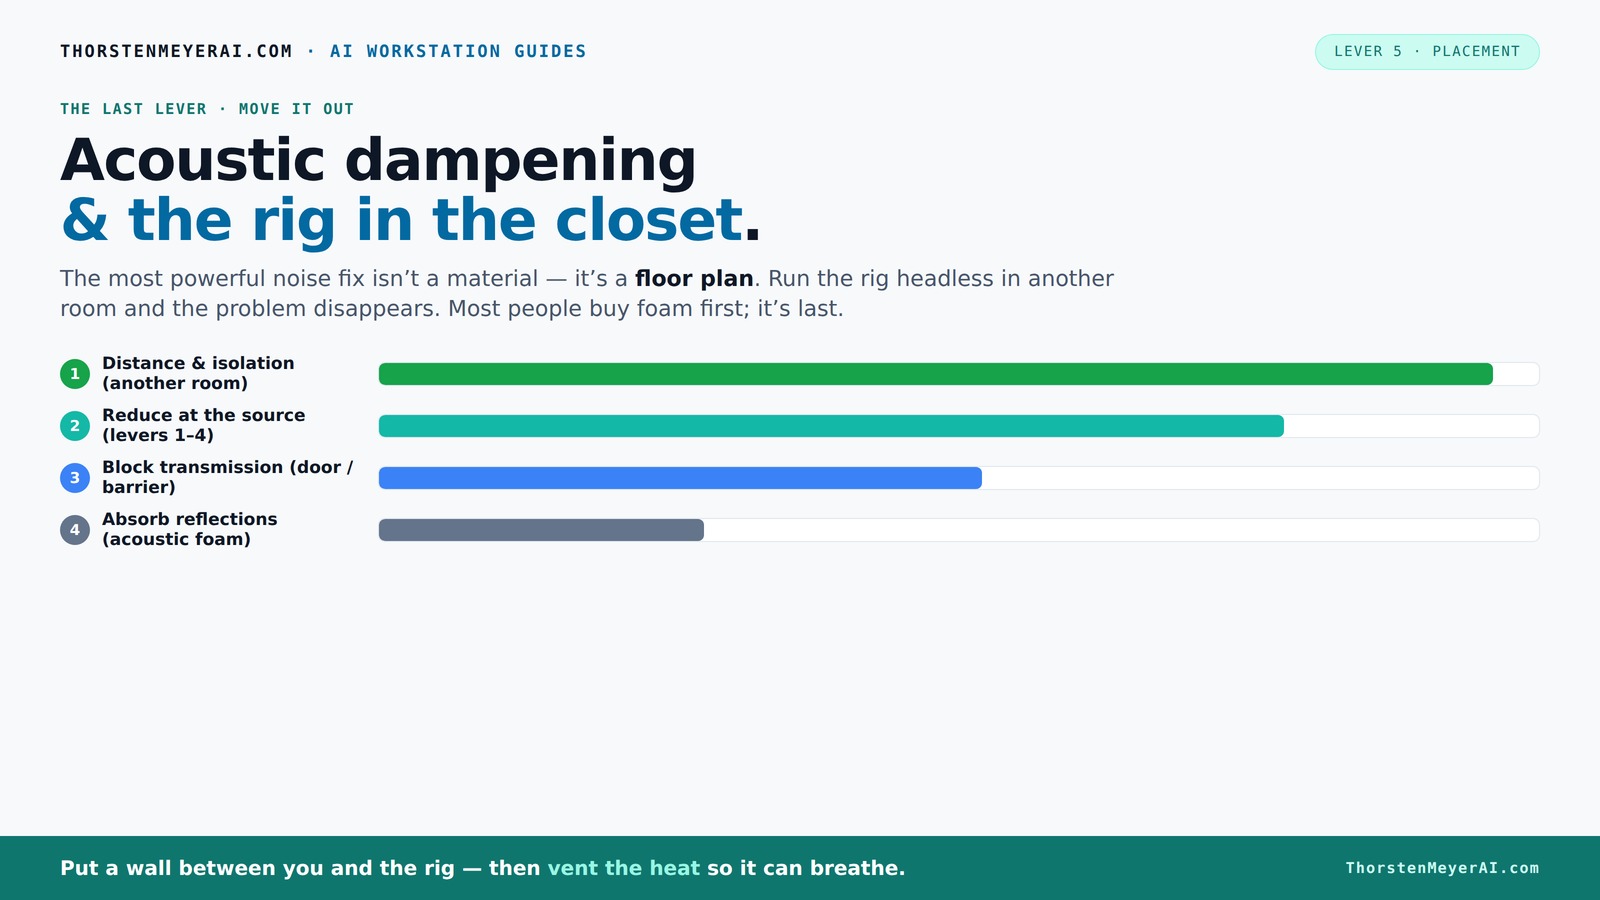
Acoustic dampening
& the rig in the closet.
The most powerful noise fix isn’t a material — it’s a floor plan. A rig you can’t hear because it’s in another room beats any amount of foam. Tap the approaches in Part 1 to see what actually works.
(another room)
(levers 1–4)
(door / barrier)
(acoustic foam)
Contain the noise, not the heat
Key Takeaways
- Most of your noise issues come from reflections and gaps, not just foam panels.
- Proper placement of absorption panels—behind the mic, at reflection points, and on the ceiling—makes a huge difference. You can find detailed guidance in this DIY acoustic setup guide.
- Sealing gaps and adding mass, like drywall or acoustic sealant, dramatically improves sound isolation.
- Bass traps in corners are essential if your recordings sound boomy or muddy.
- Ventilation is critical—don’t trap heat in a closet without an active airflow system.

Focusound 52 Pack Acoustic Foam Panels 1" x 12" x 12" Sound Proof Foam Panles Soundproofing Noise Cancelling Wedge Panels for Home Office Recoding Studio with 300PCS Double-Side Adhesive
Soundproofing - Acoustic foam panels triangular grooves structure for better noise absorption, helps to reduce and absorb unwanted...
As an affiliate, we earn on qualifying purchases.
As an affiliate, we earn on qualifying purchases.
Why Your Closet's Shape and Size Make a Difference
Small closets are echo chambers. The tight walls bounce sound back and forth, creating a boomy, muddy tone that makes your voice sound harsh. To fix this, you need to think of absorption and reflection like a sponge—more coverage on hard surfaces equals less bounce.
Imagine stuffing your closet with thick blankets and plush clothing—these act like natural sound absorbers. The key is to treat the surfaces that reflect sound directly into your mic, such as the ceiling, walls, and even the door.
For example, if your closet is 4x4 feet with a hard ceiling, adding thick panels on the ceiling and walls reduces flutter echoes and cleans up your sound. If you ignore this, your vocals will sound distant and harsh, no matter how many foam tiles you hang.
Understanding why size and shape matter is crucial because smaller, more confined spaces inherently amplify reflections. For more tips, see this article on acoustic treatment for small spaces. Larger or irregularly shaped closets can sometimes disperse sound more effectively, but they often require more targeted treatment. The tradeoff is that smaller spaces are easier and cheaper to treat, but they demand more precise placement to avoid harsh echoes and muddiness. Recognizing these dynamics helps you prioritize where to allocate your acoustic treatment efforts for optimal clarity.

ATS Acoustics Home Office Residential Acoustic Treatment Room Kit Sound Absorbing Acoustic Panel 12 Pack for 250-380 Sq Ft (Platinum)
12 Piece Kit contains 8 wall panels and 4 ceiling panels, each panel is sized 24" x 48"...
As an affiliate, we earn on qualifying purchases.
As an affiliate, we earn on qualifying purchases.
Where to Place Absorbers for Best Vocal Clarity
Placement is everything. Start with the mic: position it at least 6-12 inches away from the wall behind it, aiming to avoid reflections bouncing directly into the capsule. For more placement strategies, check this guide on mic placement. Use the 3-point method: behind the mic, side walls, and ceiling.
But more importantly, understanding why placement matters helps you make smarter decisions. Placing panels at reflection points—areas where sound bounces directly into your mic—reduces comb filtering and phase issues that can color your recordings. Using a mirror to identify these points ensures you’re targeting the most problematic surfaces, rather than wasting effort on less impactful spots.
Ceiling treatment is often overlooked but critical because overhead reflections can make your voice sound unnatural or boxy. By strategically placing panels there, you tame these reverberations, leading to a more natural and focused vocal tone. The tradeoff is that over-treating can deaden the sound excessively, so balance coverage with natural room ambiance.
Remember, more coverage on the side walls and ceiling leads to a cleaner, more focused vocal sound. A typical setup includes 2-inch thick panels on the walls and a bass trap in the corner if you notice a boomy low end. The key is understanding that placement impacts how reflections interact with your voice, so thoughtful positioning maximizes your acoustic investment.

Portable Recording Booth for Home Studio, Foldable Sound Isolation Vocal Shield with Floor Stand, High-Density Acoustic Blanket Enclosure for Singing, Voiceover & Podcast, Includes Phone Holder
INSTANT STUDIO-QUALITY "DRY" SOUND: Transform any noisy room into a professional vocal booth instantly. Engineered with high-density acoustic...
As an affiliate, we earn on qualifying purchases.
As an affiliate, we earn on qualifying purchases.
When Do You Need Bass Traps in a Closet?
Bass traps are your low-frequency heroes. If your vocals sound muffled or there's a noticeable boom or low-end buildup, it’s time to add bass traps in the corners. These traps absorb energy that causes standing waves and low-frequency resonances.
Understanding why bass traps matter clarifies their importance: low frequencies tend to accumulate in corners due to boundary effects, creating resonant peaks that muddy your recordings. Placing traps here reduces these peaks, resulting in tighter, clearer sound. The tradeoff is that bass trapping can be expensive and space-consuming, so only add them if you notice consistent low-end issues.
Imagine a corner where low frequencies resonate like a drum—adding a bass trap there will tame that boom. For example, in a 4x4 closet, placing traps in the two corners behind your mic can significantly improve clarity. But overdoing it may deaden the natural warmth of your voice, so balance is essential. Use your ears as a guide: if lows linger or cause muddiness, traps are likely necessary.

Audimute Soundproofing Acoustic Door Seal Kit - Door Sweep and Seal - (Standard Size)
Includes a Door Seal (3/16" x 1/2" x 25') and a Door Sweep (1/2" x 1.5" x 4').
As an affiliate, we earn on qualifying purchases.
As an affiliate, we earn on qualifying purchases.
Sealing Your Closet Door and Gaps for Better Isolation
Sound leaks through gaps, cracks, and poorly sealed doors. Sealing these points is often more effective than hanging foam panels. Use weatherstripping, acoustic sealant, or draft stoppers around the door frame to block noise escape. Learn more about sealing techniques at this DIY guide.
Understanding why sealing gaps improves isolation is key: sound escapes through even tiny openings, and these leaks can significantly undermine your efforts to contain noise. Proper sealing creates a barrier that prevents sound from leaking out or in, which is especially important if your walls are thin or shared with noisy spaces. The tradeoff is that over-sealing can make access inconvenient, so find a balance that maintains ease of use while maximizing soundproofing.
Picture sealing a drafty window—tightening gaps reduces leaks and enhances your room’s acoustic integrity. For example, adding weatherstripping around your closet door can cut noise transmission by at least 50%, according to soundproofing studies. Combining sealing with door sweeps and acoustic curtains offers a layered approach, ensuring better overall isolation without excessive cost or effort.
How to Use Rugs, Blankets, and Clothing as Acoustic Tools
Rugs, blankets, and clothes are your DIY heroes. Thick rugs on the floor absorb reflections, while hanging blankets or heavy curtains soften the space. Find more tips on DIY acoustic treatments at Feature Buddies. Clothing piled on shelves acts as natural absorption, especially in small closets.
Understanding why these materials work helps you optimize their use. Thick rugs and blankets diffuse and absorb sound waves, reducing flutter echoes and reverb. Clothing acts as a dispersed absorber, breaking up reflections without overly deadening the space. The tradeoff is that these solutions are not soundproof; they mainly improve clarity and reduce harshness.
Imagine draping a thick blanket over the door or lining a corner with hanging clothes—these act like makeshift acoustic panels. For example, a dense, plush blanket can reduce echo by 20-30% in a small closet, according to user reports. The key is to place these items where they intercept the most reflections, maximizing their effectiveness without cluttering the space.
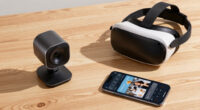
Managing Heat When Your Rig Lives in a Closet
Placing a powerful, heat-generating computer in a closet is a recipe for overheating. The noise from fans ramps up as temperatures rise, especially in sealed spaces. Proper ventilation is non-negotiable.
Understanding why heat management matters is essential: excessive heat not only risks damaging your equipment but also causes fans to run louder to compensate, which defeats your goal of a quiet space. Think of it like a tiny sauna—without airflow, heat builds quickly. For example, installing a quiet exhaust fan or vent to draw hot air out and bring in cool air can drastically reduce temperature and noise levels. Using a thermostat-controlled fan ensures consistent airflow, preventing overheating without unnecessary noise.
Active ventilation systems, combined with a small duct or vent, keep your rig cool and quiet, avoiding thermal shutdowns or fan noise that can ruin recordings. Considering dedicated soundproof cabinets with built-in airflow features can be a worthwhile investment for a silent, cool setup. The key is balancing cooling and noise reduction—poor ventilation can nullify your acoustic efforts.
Frequently Asked Questions
Can I turn a closet into a vocal booth?
Yes. By adding absorption to control reflections, sealing gaps for isolation, and managing heat with ventilation, a closet can become an effective vocal space. It’s all about treating reflections and leaks, not just filling the space with foam.Do acoustic foam panels actually soundproof a closet?
Not really. Foam panels absorb reflections inside the room but do little to block sound transmission through walls, doors, or gaps. For real soundproofing, sealing gaps and adding mass are necessary.Where should I place panels in a closet recording setup?
Start with reflection points: behind the mic, side walls, and ceiling. Use a mirror to identify where reflections bounce into your mic, then add panels there. Covering more surface area helps reduce echo and improves clarity.Do I need bass traps in a closet?
If your recordings sound boomy or bass-heavy, yes. Bass traps in the corners absorb low-frequency buildup, making your voice sound tighter and more controlled.How much coverage is enough for a small booth?
Aim for at least 50-70% wall coverage with thicker panels (2 inches or more). Focus on reflection points and corners. More coverage improves sound quality, especially in tiny spaces.Conclusion
A closet can be a surprisingly good vocal booth when you treat reflections, seal gaps, and manage heat. Focus on strategic placement and simple DIY fixes before splurging on expensive soundproofing. Your recordings will sound clearer, and your neighbors will thank you.
Remember, the best setup blends smart acoustic work with practical ventilation. A quiet, cool closet isn’t just a dream—it’s a matter of knowing where to focus your efforts.